HOW DO I CONNECT TO A VM?
Now that you have created your machine, you can connect to it. We have created the following guides to help decompose the connecting process into a set of simple commands and clicks-clicks, having the less computer savvy user in mind. Before we begin with the guides, we need to clarify some terms that might be new to an ~okeanos global user, but are important to help choose what guide suits his/her needs:
- Host machine is the computer you are using in your home i.e. your laptop, your PC
- [~okeanos] VM is the target VM you want to connect to in ~okeanos global
- Graphical connection is your typical connection type, the one with the fancy graphics that you most probably use in your host machine. (Not available for Debian Base, Ubuntu Server, CentOS, Oracle Linux and *BSD VMs)
- Command-line connection is a less typical connection type, where navigating and using your VM consists of typing commands to a terminal. (Not available for Windows VMs)
With that clarified, you can jump right into the appropriate guide:
Note: As of writing this, the most mature way to access a remote machine from an Android/iOS host is through SSH. Users that want to connect using SSH to their VMs can download their favortite SSH app and consult the "Any host to Linux VM..." guide. This unfortunately does not apply to Windows VMs.
Windows host to Windows VM [Graphical]
From the Cyclades page, select the icon of your VM. You will see the following banner
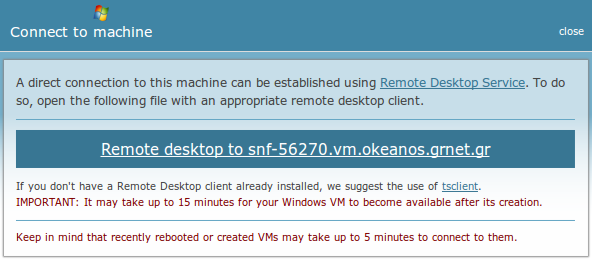
Clicking on the link will ask you to save an .RDP file to your computer. Browse to the location you have saved the .RDP file, open it and press the «Connect» button. You will be prompted to enter the password of your VM. After that, the screen of your host machine will show the screen of your ~okeanos global VM which you can now handle and operate just like your host machine.
Windows/Linux host to Linux VM [Graphical]
With this type of connection, you can manipulate every part of your Linux VM. You can browse the Internet, use the Office suites of each distro, and why not, even use the terminal!
There are actually many programs that can handle remote desktop connections and the ~okeanos global infrastructure restricts none of them. Most of these programs have a server/client architecture, which means that in order to connect to your remote machine, you need to install a client tool on your host machine and a server counterpart on your remote machine. This is analogous to the transmitter/receiver concept: the server tool plays the role of the transmitter and the client the role of receiver.
This guide describes two methods of connecting graphically to your Linux VMs. You can either:
- connect using X2Go (suggested), whose server tool is already installed on ~okeanos global Linux desktop images, supports SSH keys and has no limitation on the number of connections
- or alternatively connect using NoMachine
(Note: Both of these programs are 3rd-party solutions and may not necessarily support every ~okeanos global VM. Therefore, you are advised to check first if your OS is supported before following this guide, e.g. for NoMachine you can consult NoMachine's official list of supported OSes. In case you encounter a bug, you should notify the corresponding developer team and/or try another alternative)
Without further ado, our two methods are presented below:
Suggested method (X2Go)
(Note: You can optionally check if X2Go runs on your VM if this command: /etc/init.d/x2goserver prints a usage message. If the command fails, your VM is probably based on an older ~okeanos global image. If you wish to install X2Go Server manually, you can read this wiki guide)
With the server tool already running on your VM, you simply need to download the appropriate client for the OS of your host machine.
For Windows host machines: Download the latest .exe binary and install it. You can also find older versions of the .exe binary in the Windows binary list.
For Linux host machines: If you are using Debian Wheezy/Sid or Ubuntu Precise (12.04) and later, you can easily install X2Go client with the following command:
$ sudo apt-get install x2goclient
Else, you should refer to the X2Go's documentation for installation instructions for your distribution.
For MacOS X host machines: Download the latest .dmg binary and install it. You can find older versions of the .dmg binary in the MacOS X binary list. If the latest binary does not work for you, check out this X2Go FAQ for a possible solution.
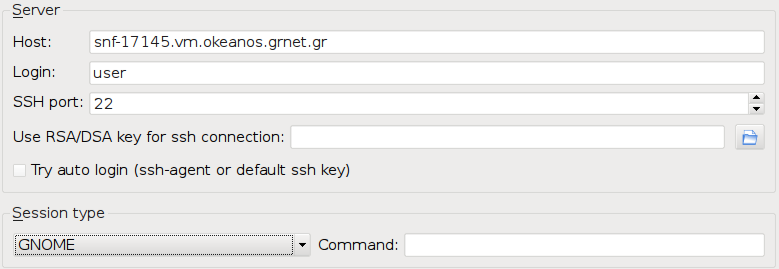
Once the X2Go Client is installed, you must fill the following fields:
- Host: The hostname of your VM. Fill in either the VM's hostname (snf-XXXXX.vm.okeanos-global.grnet.gr) that you see when you click on the icon of your VM on Cyclades or the IPv4 address of your VM.
- Login: The VM's user account. You can also see this when you click on the icon of your VM in Cyclades. It's typically user or root.
- Session Type: The Desktop Environment of your VM. This depends on the distro of your VM. You can find yours by visiting the Cyclades page, click on the "New Machine" button, click on the "Details" button of your OS image and then check the "GUI" field.
Finally, click on the connection balloon with the puppy ghost face (PUPPIES!) and you will be prompted to enter your password (unless you have opted to login using SSH keys). Once your login is confirmed, your VM's desktop should appear on your screen in no time!
Alternative method (NoMachine)
For this method, it is imperative to initiate first a command-line connection to your Linux VM. If you don't know how to do so, you can read the Any host to Linux VM [Command-line (SSH)] guide.
Do you have a working connection now? Well, let's continue with rest of the process. Follow these steps:
Step 1: Install NoMachine on your VM
There are appropriate packages for each distribution in NoMachine's download page.
- For Debian/(K)Ubuntu VMs, choose the DEB package for Linux-x86_64,amd64.
- For OpenSUSE/Fedora VMs, choose the RPM package for Linux-x86_64,amd64.
Then, you need to download this package in your VM. For this task, you can use wget. For example, from your host machine, you can copy the link address (url) of the package and then issue this command from the VM:
$ sudo wget <package url>
Once you have downloaded the appropriate package to your VM, you can install it with one of the following commands.
For Debian/(K)Ubuntu VMs:
$ sudo dpkg -i <package name>
For OpenSUSE/Fedora VMs:
$ sudo rpm -i <package name>
Note: For Fedora machines, we propose you acquire superuser privileges using su and then follow the steps above - minus the sudo command of course.
You can now close the command line connection.
Step 2: Install NoMachine on your host machine
Similarly to the first step, you can download the appropriate package for the OS of your host machine. (NOTE: If you're looking for a client package, there ain't any. Simply put, these packages are both for clients and servers)
Step 3: Get Connected!
After you have completed the installation of the NoMachine on both machines, you can start the NoMachine connection manager from your host machine. There, you only need to fill the hostname or IPv4 address of your VM (both of which can be copied from the Cyclades page) Finally, fill in the username and password of the VM and the graphical session will begin.
Any host to Linux VM [Command-line (SSH)]
You may be interested in connecting that way when you do not need the graphical interface of the Linux VM, but you just want to run some commands on it.
Step 1 (Only for Windows hosts): Download Putty!
Putty is a tool used in Windows to connect via command line to remote computers. You can download the latest version from the official page .
Note: The official site does not have 64-bit binaries (more in Putty's mailing list) . If you have a 64-bit Windows host, we recommend to download the 32-bit version, as the functionality remains the same.
Step 2: Connect via SSH
In Cyclades, select the icon of the VM you want to connect. A new banner should appear.
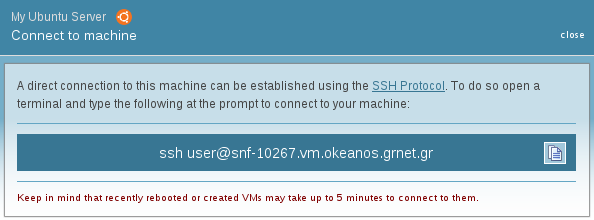
Copy the username and host name (i.e. an address of this form snf-XXXXX.vm.okeanos-global.grnet.gr where X=0-9) that appears in the banner and:
-
If you have Windows host machine, open the executable putty.exe and paste in the "host" field (not to be confused with "host machine") the appropriate "<username>@<hostname>" and press "Open". This will open a new window in which you will be prompted to enter the VM's password.
-
If you have Linux host machine, just type in a terminal:
$ ssh <username>@<hostname>
and enter the VM's password.
That's it! You are now connected via command line to your Linux VM.
Linux host to Windows VM [Graphical]
You will need to install in your host machine the Remmina remote desktop client that exists in most Linux distributions. Start it, download the .rdp file as mentioned in the Windows host to Windows VM [Graphical] guide and drag 'n drop it to the Remmina window. You should see the following:
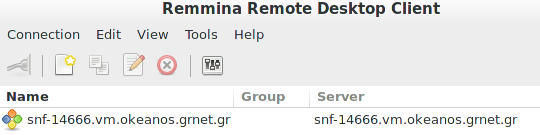
Finally, click on the new connection entry and provide your password when prompted. Your Windows VM is now ready to use.
Connecting via console
When all fails, there is still a tool that can help you with troubleshooting. It is called "Console" and you can find it from here:

Pressing "Console", a new window will pop up where you should be able to see the raw video output of the VM.
But why should you choose the console connection?
Generally, you won't need to. The console is primarily used for troubleshooting because it allows direct access to the "screen" of the VM, even when you can't seem to connect to it. However, this comes with the cost of a high latency response (much higher than the latency of the methods mentioned above) and loss of useful keyboard shortcuts such as Ctrl-C, Ctrl-V etc.
CYCLADES USER GUIDE
- How to create a VM?
- How do I connect to a VM?
- How do I manage my VM?
- How can I resize the CPU/RAM of an existing VM?
- How can I attach/detach an IP on a running VM?
- How can I add extra disks to my VMs?
- How can I detach an extra disk from a VM?
- How can I add tags to my VMs?
- How can I assign my VM to a project?
- What are SSH keys and how can I use them?
- What are private networks?
- What is a firewall and which one should I choose?
- How to create VMs from custom images?
- How can I access all my VMs using one public IP (NAT)?
- How can I update the VirtIO drivers of my Windows VM?
- How can I add IPv6 nameservers on my CentOS/Oracle Linux VM?